LED Strip Accessories: Must-have Kits For LED Projects

LED strip lighting is designed to suit all kinds of applications. You can install LED strips indoors, outdoors, and on almost any surface. You also get to choose what color of lighting you prefer and enjoy a myriad of control options.
In addition to all the great features, the best part about LED strip lighting is that you can install it all on your own. You only need some basic accessories and an understanding of how to set everything up. If you are wondering where to begin with your installation, you are in luck. Below is a complete guide on all things LED accessories. Let’s dig in, shall we?
Table of Contents
LED Strip Power Adapter

A LED strip power adapter delivers electrical power from the power outlet to your LED strip lights. It serves as a safe channel where electrical output is managed so that it is conducive for the LED strip lights. This is important in ensuring that the lights function optimally.
LED strip adapters are also referred to as LED drivers. They are available in different varieties that are suited to different types of LED strips. They include:
- Constant Current LED drivers
- Constant Voltage LED drivers
What is a Constant Current LED Driver?

A constant current LED driver is an adapter that delivers a consistent level of current to an LED strip. If, for instance, it is a 5A constant current LED driver, it will maintain a 5A current delivery no matter the heat changes in the circuit.
How Does a Constant Current LED Driver Work?

A constant current LED driver is designed to solve this problem. By supplying a consistent amount of current, it protects the LEDs from electrical damage. It also ensures that your LED strip maintains a steady level of brightness.
Why Use a Constant Current LED Driver?

The alternative to a constant current LED driver is a constant voltage driver. So, you might be wondering why not opt for the latter?
Suffice to say, a constant voltage LED driver on its own would be insufficient. It is thus advisable and safer to opt for a constant current LED driver.
How to Choose a Constant Current LED Driver

When choosing a constant current LED driver, consider:
The power draw of the LED strip- it is often indicated by manufacturers in Watts of Watts/Meter.
The voltage of the LED strip- this is usually indicated by the LED strip manufacturer. Most strips require 12V or 24V and your driver should meet the recommended voltage requirement.
The length of your installation- longer lengths of LED strip runs require a higher capacity driver than shorter runs.
AC-DC or DC-DC– this will depend on the power outlet you are using. If it is an AC outlet then you will need an AC-DC driver because LED strips run on low voltage direct current(DC).
Aim for a constant current LED driver that has a slightly higher capacity than the power draw of your LED strip. For example, if the power draw is 35A then a 40A driver would be ideal. Think of the extra wattage as extra protection. It would also allow you to comfortably adjust your installation if you need to.
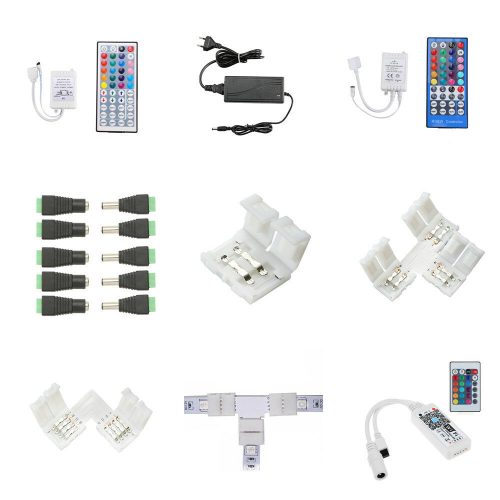
LED Strip Connectors

LED strip connectors are components that allow you to:
- Join LED strips to each other.
- Connect LED strips to a power source if their original connection points are not compatible.
- Facilitate connections between corners- bending a LED strip around a corner could cause poor transmission and interfere with the lighting.
In brief, a LED connector can be defined as a bridging device. It is far more convenient than soldering different parts of your connections together.
How Does a LED Strip Connector Work?

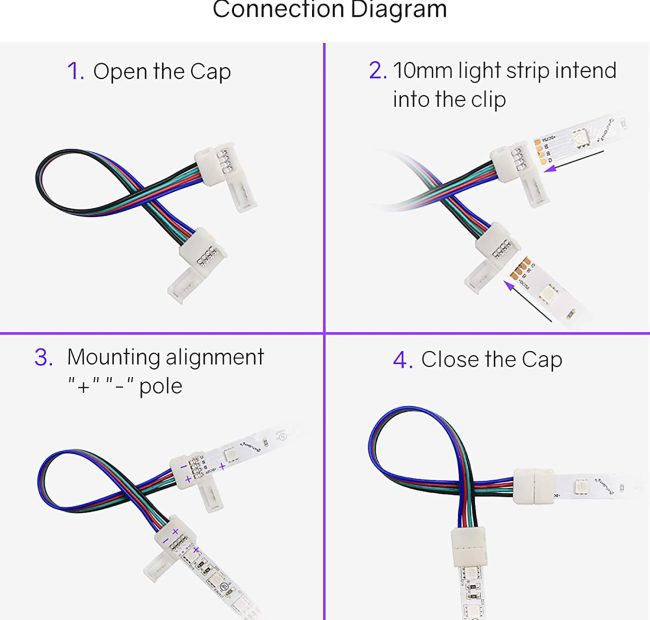
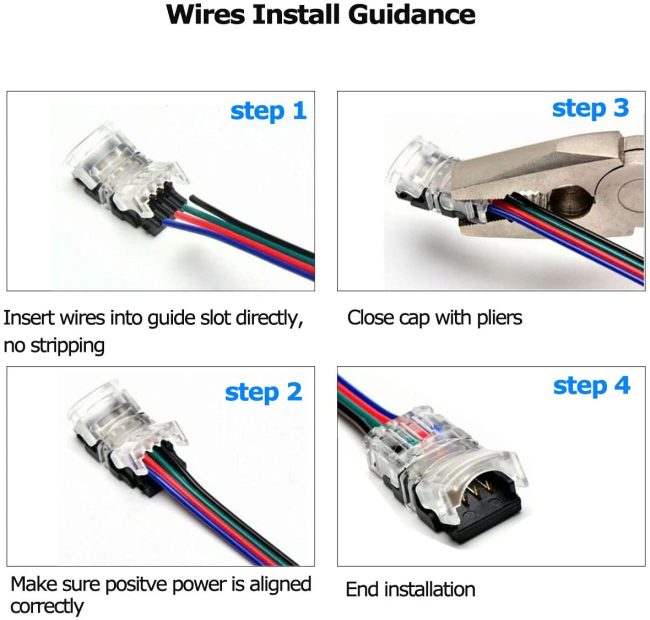
LED strip connectors have connection portals on both ends with metallic pins. One end is for the LED strip light and the other would be for whatever you intend to connect it to. The pins act as conductors to maintain transmission within the connection. The strips or wires being connected are held in place on the LED strip connector using a plastic buckle or clip.
LED Strip Controllers

A LED strip controller is a device that is used to transmit commands to LED strip chips to bring about a particular desired effect.
How Does a LED Strip Controller Work?
LED strip controllers differ based on how they transmit signals to the LED strip. As such there are 2 types of LED strip controllers:
- Radio Frequency (RF) controllers
- Smart controllers
Radio Frequency Controllers

Some examples of RF controllers include:
Correlated color temperature (CCT) Controllers- they send signals to the chips in CCT LED strips to either raise or decrease the temperature to produce a certain hue of light.
RGB LED Controllers – they are 3 channel controllers that are used to change colors or create color effects in RGB LED strips. As an illustration, let us assume you would like to change your lighting from red to blue. When you input the command, the controller sends a signal to power down the red and green channels while the blue channel is powered up.
Single-colored LED Dimmers– this type of RF controller increases or decreases the brightness of LED strips by sending signals to the LED driver to increase or decrease the power output. It is a single-channel controller.
Smart LED Strip Controllers

Smart controllers communicate with LED strip lights via wifi or Bluetooth and are only compatible with smart LED strips. They work as follows:
You would begin by installing a smart lighting app on your smart device that is compatible with both your device and your smart LED strip.
Connect the smart LED strip to your smart device via Bluetooth or a common wifi network.
Control the LED strip using the options provided in the lighting app.
Given as Bluetooth and wifi connections can span for a substantial distance, smart controllers offer more freedom. You can control your lights from different areas within range without worrying about obstacles. Lighting apps also offer a wide array of prompts such as:
Color changing and effects
Syncing lighting effect to music beats or song selection
Timed effects
LED Strip Light Extension

A LED strip jumper is simply a cable that you can use to complete connections between the power supply and the LED strip. They come in handy when you need to:
- Run a gap between LED strips
- Bridge the connection between the LED strip and the power source
How do LED Strip Jumpers Work?

There are 2-pin and 4-pin LED strip jumpers. 2-pin jumpers are designed for single-color LED strips while the 4-pin variety is for RGB LED strips.
2-pin cables often have barrel plugs on each end which makes them easy to install. One end connects to the power supply while the other is joined to the LED strip cord.
When choosing a LED strip jumper, ensure that its voltage capacity is compatible with the rest of your set up. For instance, if you are running a 12V LED strip, you need a 12V cable. Further, keep in mind that longer installations are susceptible to voltage drop and you have to use LED amplifiers.
LED Strip Wire

A LED strip wire is a conductor wire that can be used in place of an LED jumper. Jumpers are great solutions but they only come in specific lengths. When you need to run an arbitrary gap length, a LED strip wire gives you all the freedom you need. You can cut it to whatever size you need.
How Does a LED Strip Wire Work?

LED strip wire is ideal for:
- LED strip to LED strip connection
- LED strip to the power supply
- LED strip to amplifier connection
For a single-color LED strip, you would need a 2 conductor wire. An RGBWW LED strip, on the other hand, would require a 4 conductor LED wire. Both varieties are often compatible with 2-pin and 4-pin LED connectors respectively. Alternatively, you could choose to solder the connections if you do not have LED connectors.
LED Amplifiers

A LED amplifier is a device that steps up power supply and transmission signals in a long LED strip connection. There are different types of amplifiers for various LED strips. They include:
- Single-color amplifiers
- RGB and RGBW amplifiers
- Tunable white LED amplifiers
How do LED amplifiers Work?

If the length of your LED strip is long, voltage drop is common. Which begs the question, what is voltage drop?
LED amplifiers solve this problem when they are installed at regular intervals of your installation. How do you know where to install them? Most LED strips have a recommended ‘maximum run’. This is the maximum length of that LED strip that you can install before voltage drops. So, if the recommended maximum run is 20ft, you will need to install an LED amplifier after every 20ft.
How to Choose an LED Amplifier

As you choose an LED amplifier, consider:
How much power do the LED strips need – the amplifier should not overpower the LED strips lest it damages them.
The capacity of your power supply – if your connection is running on 24V the power supply has to have a capacity of at least 24V or more.
How many LED strips do you need to amplify- your amplifier should have the capacity to support the LED strips you will connect it to without getting overloaded
LED Profiles

A LED profile is a hollow bar made of aluminum that you can use to house your LED strip. They come in different sizes and can even be custom-made to fit your needs. Be sure to order a size and style that is commensurate with the needs of your installation.
How Do LED Profiles Work?

Aluminum LED profiles are often a plug and play solution. The installation process works as follows:
- When you have the right profile, affix the LED strip on the hollow part of the LED profile.
- You will then need to install the profile on your desired surface. Depending on the brand, aluminum LED profiles can be installed either using brackets or an adhesive strip on the back.
LED profiles are useful for both aesthetic and functional purposes such as:
Protect your LED strip from excessive impact – as opposed to being installed on its own, the LED strip would be ensconced in the profile. This is useful in areas like stairs with high foot traffic.
Providing a more structured LED strip installation – a LED profile is a good idea if you would like a more sophisticated look for your LED strip installation. It presents as a lighting fixture rather than just a bare strip of LEDs.
Important LED Project Tips

Given all the accessories you have to choose from, installing LED strips may begin to feel daunting. However, when you understand the basics of the setup, the rest of the project is a walk in the park. To help you, here are some key steps that you use to prepare for your project.
Measure the distance– this will determine the length of LED strip lights you need. Factor in bends/corners as well as sections where you would like to run gaps. Consider what you would like to use to run the gaps; will you use jumpers or LED wire?
Choose the right LED strips for your needs- in terms of color, you get to choose between single-color, RGB and RGBW LED strips. If, however, you would like warm or cold hues of lighting, CCT LED strips would be your ideal solution. Some top brands also offer custom LED strips if you have unique lighting needs.
By anticipating your needs, you will be able to come up with a finite list of the accessories you will need. This will save you lots of time and money as you will not shop for the project blindly.
Safety

Pay attention to electrical safety as well:
- The power supply should remain off until you are ready to test
- Your entire work area should be dry
- Wear protective gear like gloves or a face shield when soldering
- Use certified authentic merchandise
Conclusion
Aside from the sheer adventure of it all, a DIY LED strip installation gives you full control over your lighting. You will also learn a lot about LED lighting which will come in handy for maintenance and other future installations. Keep an open mind and be inquisitive too as you make your purchases. A good LED strip manufacturer should have no qualms recommending the best accessories for their products upon request.


